
Kids insist on being relentlessly involved when it comes to arts and craft activities using tissue paper.
These activities are not only fun, but also give a creative boost to the innocent minds of toddlers.
And if you are looking for some novel and unique ways to engage your toddler in making some fantastical craft items with tissue paper, then you – dear reader – have come to the right place.
Let’s begin this artsy journey and delve into how you can help your young ones create innovative craft items using tissue paper.
DISCLAIMER: PaperCanyon is reader-supported. If you make a purchase through links on our site, we may sometimes earn a commission at no additional cost to you. As an Amazon Associate, we earn from qualifying purchases.
Making Butterfly Sun Catcher Using Tissue Paper
If you are looking for a fun activity to teach preschoolers or your home-schooled toddler during spring, then making a butterfly sun catcher with tissue paper is your way to go about it.
In fact when coupled with life sciences, it can also be an educational activity. You can use this activity to help your young ones learn about the life cycle of a butterfly starting from a caterpillar.
Who would have thought that some day tissue paper would also be used to teach? Moreover, it enhances the motor skills of young kids due to the hand-eye coordination involved while making it. And now let’s move on to the exciting bit.
Supplies:
- Colored tissue paper
- Clear contact paper
- Glue stick
- Hobby knife
- Cardstock Paper
- Scissors
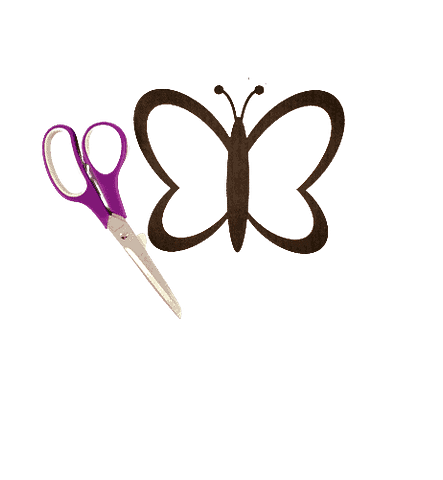
- A butterfly template
For a butterfly template, you can find something similar to the image provided below.

How to Proceed?
- Gather all the supplies including the printed copy of your butterfly template. Cut it along the edges.
- Now, with the help of your hobby knife, cut out the white part on the inside as well. This will leave you only with the black outline of the butterfly.
- Now, get your colored tissue paper. Cut the tissue paper into long stripes of varied colors.
- Now, apply glue on the tissue paper and stick it on the hollow ‘wings’ of the butterfly.
- You can pick your style of gluing tissue paper. Be it horizontal or vertical, alternatively color coded or not color coded at all. It is up to you to decide the type of wings you would like your butterfly sun catcher to have.
- Trim out the extended stripes of tissue paper.
- Now go outdoors, or even at a window. It will work as long as it is a well lit area.
- Hold your butterfly sun catcher against the sunlight and watch the colors on tissue paper rejuvenate and come to life!
Making Confetti Vase Using Mod Podge and Tissue Paper
Buying a ceramic vase from a chic store has its own perks, but nothing beats making a confetti vase at home with your young one. And the best part is this can be done using materials easily available at home. So let’s find out how to make a confetti vase using mod podge and tissue paper.
Supplies:
- Glass jar or a flower vase
- Mod Podge
- Sponge brush
- Colored tissue paper
- Scissors
- Pencil
How to Proceed?
- In order to begin, you will require either a compass or an object using which you can make circles on the tissue paper. You can also use a cup or glass with a circular diameter.
- Carve out as many circles as you think will cover up your entire glass jar. Ensure that you are using as many colorful tissue papers as you can.
- Now, apply mod podge on the glass jar and stick the colorful tissue paper circles one by one. Since mod podge dries faster, you can apply it in sections.
- Start with the mouth of the glass jar and try to cover it entirely first.
- Wait for it to dry and flip the jar over on its mouth.
- Repeat the same process on the bottom side of the jar.
- Do ensure that you cover the entire jar with colored tissue paper and do not leave any space behind.
- After it has dried, apply another layer of mod podge on the confetti to make it more concrete and water proof.
This craft activity with tissue paper can be applied on almost any glass surface. You know what this means, right? The possibilities are endless. You can craft confetti jewelry trays, mugs and other decorative trays through this fabulous, customizable and trendy method.
Moreover, you do not necessarily have to cut out circles. It can be squares, rectangles, triangles or even your young one’s favorite shape. Spend some quality time with your toddler and make your own flower vase.
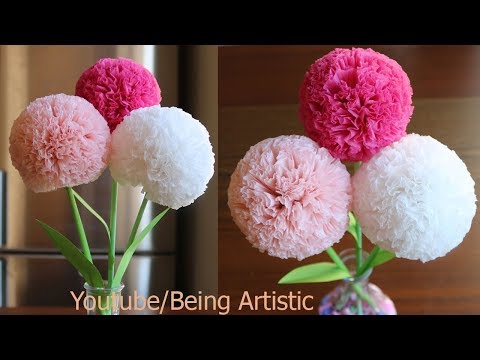
Making DIY Tissue Paper Flowers
Honestly, we believe that tissue paper flowers are much better than the ones available at stores. In fact, one of the major perks of making tissue paper flowers is that you can make them in any size you want. From small as a bird to magnanimous as a bouquet, tissue paper flowers can be made in varied sizes, colors and patterns. Let’s explore how.
Supplies:
- 4 sheets of tissue paper, with at least two different colors
- Scissors
- Green pipe cleaners, or chenille stems
How to Proceed?
- Using alternate colors, layer the four sheets of tissue paper together.
- If you would like to make large flowers, then cut out rectangles about 6” x 10” in size from the sheets of tissue paper. On the other hand, if you would like to make small flowers, then cut out rectangles about 3” x 5” in size. You can also experiment and play around with different sizes of paper to make flowers personalized as per your appeal.
- Fold the tissue papers together using an accordion fold or a zig-zag fold.
- Now, get your pipe cleaner and place the center of your accordion folded tissue paper about 2 inches over the top of the green pipe cleaner.
- Now, fold the pipe cleaner around the accordion fold tissue paper and make a tight swirl.
- Twist the pipe cleaner again and repeat the process at least four times.
- Now, slowly and gently pull up the layers of tissue paper. Perform this action from the center towards the outside, one tissue paper at a time.
- Your DIY tissue paper flowers are ready to be flaunted.
Let’s get virtual!
If you are fascinated by the concept of making DIY floral designs using tissue paper, then we have something that will definitely excite you. Learn more about floral craft using tissue paper by clicking on the YouTube link provided below.
“How to Make Round Tissue Paper Flower – DIY Paper Craft”
In this YouTube tutorial, you will learn how to make round tissue paper flowers with easily available materials at home.
In fact, all you need are tissue papers and firm strings that will act as stems.
The tissue papers are layered together and an accordion fold is made out of them. They are then turned into aesthetically blooming flowers. Go ahead and click on the link to make easy round flowers using tissue paper.
Making Cherry Blossoms Using Tissue Paper
Spring brings along with it the pleasantries of cherry blossoms. Those pink tops that could only remind you of good ol’ picnic days or swinging by the swing set with your toddlers. Ah! The glory. What if we told you you could eternalize that memory using tissue paper crafts? Well, yes you can and it even makes for an innovative activity to do when you are with your toddler. Let’s see how to go about it.
Supplies:
- Liquid school glue
- Multi Colored tissue paper, preferably in different shades of pink
- Brown marker
- White cardstock paper
- Craft scissors
How to Proceed?
- Cut the tissue paper into small squares of size 2” x 2”.
- Now, using the brown marker draw a branch on the white cardstock paper. And don’t worry too much about professional drawing skills as tissue paper will cover most of it.
- Now, scrunch the tissue paper and glue it onto the branches until they look like a cherry blossom tree.
Making Crumpled Easter Eggs Using Tissue Paper
One of the things that tiny tots look forward to on Easter is searching for the hidden eggs. And so making crumpled eggs with tissue paper on this festive occasion works as the perfect home decor. The tiny fingers that crumple the tissue paper coupled with the fascination at every step make for a unique blend of artsy caliber. Let’s explore how to make the best crumbled easter eggs using tissue paper.
Supplies:
- Cardstock paper or cardboard paper
- Multi Colored tissue paper cut into squares of 3 inches each
- Pencil
- Glue
- Scissors
How to Proceed?
- Get a printed template of an easter egg. This is easily available online with a vast collection of options.
- Give this printed template to your young one and ask them to design simple patterns on it. These may include zig-zag lines, squiggles, stripes and dots.
- Now, take a 3 inch square of any color. Crumple it up and twist it in the middle such that it has a tuft. This side is the outward side that will be visible.
- Apply glue on the other flat surface and stick it onto the easter egg. Repeat the process till the entire egg is filled with vivifying colors of tissue paper.
- It is up to you to decide if you would like to use the same colored tissue paper for a single layer or explore your limits by experimenting with various colors.
Making Butterflies Using Tissue Paper
Think about adorable little butterflies made using tissue paper and stuck on the walls of your living room. Isn’t that the cutest thing ever? Well along with being super cute, it is also super easy to craft them. They do not require a lot of time and make for the most wondrous arts and craft activity with tissue paper especially during the butterfly season. While making this butterfly using tissue paper, why don’t you ask your toddler which season is the butterfly season?
Hint: It is the same season during which flowers have started blooming again after a shedding period.
Supplies:
- Gold pipe cleaner
- Multi colored tissue paper
- Scissors
- Glue
How to Proceed?
- Take two sheets of tissue paper with any color of your choice. Place them one on top of the other.
- Now, fold it halfway through toward the bottom side. Make another fold in half to one of its sides.
- Put the longest edge of the tissue paper across. Fold the tissue paper back and forth one inch at a time in an accordion folding pattern or a paper fan like fold.
- Cut out two triangles from the center on either side of the tissue paper and tie a ribbon around it.
- Cut down through the center of both folded sides of the tissue paper till you reach the tied part.
- Now, get your gold pipe cleaner and swirl it around the center, twist it towards the top and then fold down the edges.
- Now, separate these sheets with utmost precaution and fragility starting from the top.
Let’s get virtual!
You have come across various novel ways of using tissue paper to make floral designs and butterflies and what not. But have you ever tried making leaf art using tissue paper? To put it simply, using tissue paper to make leaf art is yet another modern yet unique way of making artsy craft items using tissue paper. Here is a link to a YouTube tutorial that will help you learn how to make aesthetic leaf art using tissue paper.
“Tissue Paper – Leaf Art (Book 5/ Page 43)”
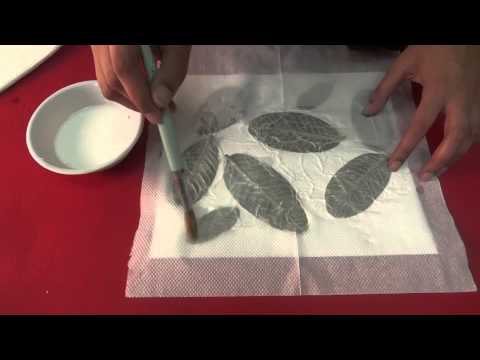
In this YouTube tutorial, you will learn how to make leaf art using tissue paper. This could act as a hobby for those who like engaging in the complex intricacies of nature.
In order to begin, you will first require real life templates of leaves. These are easily available in your patio, backyard garden or any other park. After sticking the leaves onto a cardstock paper using glue, a tissue paper is kept on top of it.
In order to sort of fossilize the leaves onto the tissue paper, a paste is made and applied on top of the tissue paper.
A few tricks here and a few fold there and viola!
Your leaf art made out of tissue paper is ready to be framed, showcased and flaunted with all its natural glory.
Frequently Asked Questions (FAQs):
Tissue papers are easily available at almost any stationery store. They are also available at various office supply stores and paper stores. The quality of the tissue papers may vary, but do keep in mind that if you are looking for premium quality then four ply to six ply papers are considered to be the best. Apart from suc stores, you can also buy tissue paper in bulk at other online sites such as Amazon and Flipkart. They have a great range of options at pocket friendly prices.
Yes, crafting with tissue paper is safe for toddlers as they are soft and gentle to touch and do not have any sharp edges or blades that could possibly injure the kids. However, while performing such crafts activities there might be other necessary material such as scissors required for carving, trimming or cutting tissue paper. Do ensure that you being the adult perform all these activities.
Yes, some tissue paper is made out of chemical agents, harmful dyes and even the element chlorine. It is recommended to not use these types of tissue paper when crafting with the young ones. On the other hand, using eco friendly and biodegradable tissue paper is safe and healthy for arts and craft purposes.
Like regular paper, tissue paper is also made out of wood pulp extracted through various mechanical processes. In fact, if you stick together several layers of tissue paper, you get this one particular type of paper called crepe paper. Crepe paper is used in in streamers and is more opaque than tissue paper.
Conclusion
And now it’s time to bid for adieu!
Arts and craft using tissue paper may not be as old as an invention, but the boost in ideas about how they can be used in novel ways has always left a fascinating mark (quite literally on paper).
You can check Coolcrafts.com for more such beautiful paper crafts.
Have your young ones engage in creatively stimulating activities that only help in enhancing their motor skills.
Who knows, maybe they will be the next Van Gogh.


Avni Deopura
Content Writer
An SEO Expert, a Prolific Content Writer, and a dreamer currently pursuing a postgraduate degree in Master of Science in Psychology from St. Joseph’s College of Arts and Science. She is working as a Content Producer and Social Media Analyst.
End of – “Awesome Tissue Paper DIYs and Craft Ideas for Kids“